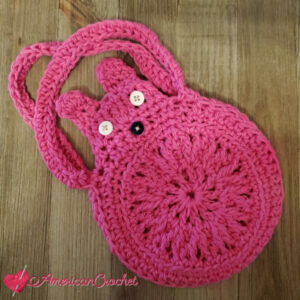
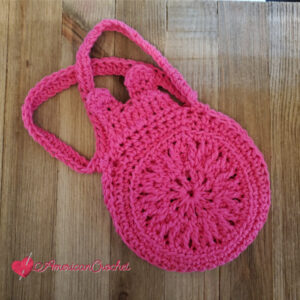
Dress up a little girl’s outfit with this cute little Hippity Hoppity Mini Bag. You can even make a few to coordinate with her outfits. This cute mini bag will also dress up that Special Easter or Spring outfits. I am offering the Hippity Hoppity Mini Bag as a free crochet pattern for you. You can find more of my bag crochet patterns HERE.
By Mistie Bush
April 1, 2020
#HIPPITYHOPPITYMB
I am using the rest of the Peaches & Creme cotton yarn that I used when making the Spring Morning Mini Bag. You will need a few other materials in order to complete this project and we will get to those shortly. Not to worry I am sure you have everything on hand.
My little Diva has a lot of love for all animals and she thinks bunnies are the cutest things besides her puppies. I couldn’t help but make her the Hippity Hoppity Mini Bag. Enjoy!
Oops I did it again (yep that song is stuck in my head) LOL I made another mini bag! The Hippity Hoppity Mini Bag is on it’s way to my little Diva (aka my niece).
In some of my other mini bag posts I have shared with you our love for bags. After chatting with her these past few weeks I decided she needed a bunny bag. Something different and unique. I hope she loves it as much as I loved making it. I know Easter is almost here but I may just have to whip up a few more before Spring is over.
While working on this project I decided I would share it with you. Do you like making little bags and/or purses for your little ones?
I had a blast making her the Hippity Hoppity Mini Bag. I am 100% positive I will be making her more bunny bags along with other related items. Just to be clear I am in hot water with my nephew. LOL Looks like some boy themed projects will be coming soon.
Hippity Hoppity Mini Bag ~ Free Crochet Pattern
Level of Difficulty
Beginner – Intermediate
Yarn
100% Cotton #4 and Scrubby yarn
Hook and Notions
Size Hook: H (5mm), I (5.5mm), scissors, stitch markers blunt & sewing needles, 3 – small buttons and 1 button about 1.5” – 2”, and DMC 25 Thread
Measurement
6” circumference & 8” high (before handle)
Gauge – in pattern
Abbreviations
Ch/chs = chain/chains
Sc = single crochet
Hdc = half double crochet
Dc = double crochet
Tr = treble crochet
FP hdc = Front Pos half double crochet
Sec dec = single crochet decrease
Notes
I used Peaches & Crème Cotton & Red Heart Scrubby – white
Starting in the round and work your way around.
Chain 1 at beginning of round does not count unless otherwise stated.
Chain 2 at beginning of row counts as a hdc unless otherwise stated.
Chain 3 at beginning of row counts as a dc unless otherwise stated.
Chain 4 at beginning of round counts as dc and chain 1
Chain 5 at beginning of round counts as dc and chain 2
4 inches in circumference at end of Round 3
Queue & Favorite on Ravelry!
Special Stitches
Back Loop Only (BLO) – Working in the back loop only of indicated stitch
Single Crochet Decrease (Sc dec) – Insert hook in next stitch, yarn over and pull up a loop (2 loops on hook), insert hook in next stitch, yarn over and pull up a loop (3 loops on hook), yarn over and draw through all 3 loops on hook. (You should have 1 loop remaining on hook).
Treble V Stitch – in indicated stitch work (tr, ch 1, tr)
Hippity Hoppity Mini Bag ~ Free Crochet Pattern
Instructions
COLORS: A – Pink; B – White (Scrubby)
Working with Color A and I hook
Bunny Body
Chain 4; join with a slip stitch in 1st chain to form a ring.
Round 1: Chain 4, *dc, chain 1,* repeat from *to* around 10 more times; join with a slip stitch in 1st hdc. (12 dc, 12 ch 1 sps)
Round 2: Slip Stitch into next chain 1 space, chain 5 (See Notes),* dc in next chain 1 space, chain 2,* repeat from *to* around, ending with chain 2; join with slip stitch in 1st hdc. (12 hdc, 12 ch 2 sps)
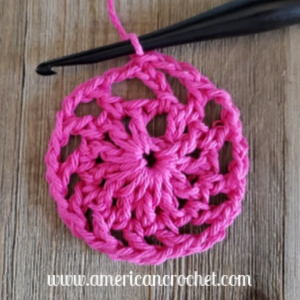
Round 3: Chain 1, hdc in same stitch as join, *work TR V-Stitch in skipped stitch on Round 2, hdc in next stitch,* repeat from *to* around; join with a slip stitch in 1st hdc. (12 TR V-Stitches, 12 hdc)
At this point you should measure 4 inches.

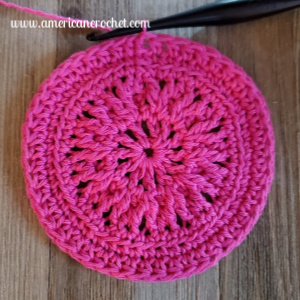
Round 4: Chain 1, sc in same stitch as join, sc in each stitch and chain 1 space around; join with a slip stitch in 1st sc. (48 sc)
Round 5: Chain 1, BLO sc in same stitch as join, BLO sc in each stitch around; join with a slip stitch in 1st sc. (48 BLO sc)
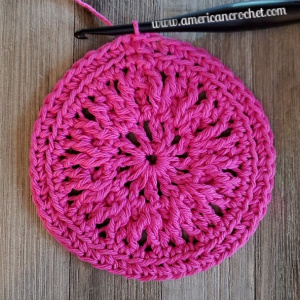
Round 6: Chain 1, hdc in same stitch as join, hdc in each stitch around; join with a slip stitch in 1st hdc (48 hdc)
Gauge at this point: 6 hdc = 2 inches & measures 6 inches.
Head
Now you will be working in Rows.
Row 1: Chain 1, sc in same stitch, sc in next 8 stitches. Turn (9 sc)
Row 2: Chain 1, hdc in same stitch, hdc in next 3 stitches, work 2 hdc in next stitch, hdc in last 4 stitches. Turn (10 hdc)
Row 3: Chain 1, FP hdc around each stitch across. (10 FP hdc)
Row 4: Chain 1, sc in same stitch, sc in next stitch, sc dec over next 2 stitches, sc in next stitch, sec dec over next 2 stitches, sc in last 2 stitches. (7 sc)
[embedyt] https://www.youtube.com/watch?v=ByAKJW-ZVB8[/embedyt]
First Ear
Row 1: Chain 1, sc in same stitch, sc in next 2 stitches. Turn (3 sc)
Row 2: Chain 1, sc in same stitch, work 2 sc in next stitch, slip stitch into last stitch. Turn (3 sc)
Row 3: Chain 1, sc in next stitch, sc in next 2 stitches. Turn (3 sc)
Row 4: Chain 1, slip stitch, work 3 hdc in next stitch, slip stitch in last stitch.
Fasten off and weave in ends.
Second Ear
Attach yarn behind the last stitch on Row 4 of Head
Work Rows 1-4 just as we did for the First Ear
Fasten off and weave in ends.
At this point you should measure 6 inches wide and 8 inches tall.
Bunny Bottom (aka back of bag)
Using Color A and H Hook
Chain 5; join with a slip stitch in the 1st chain to form a ring.
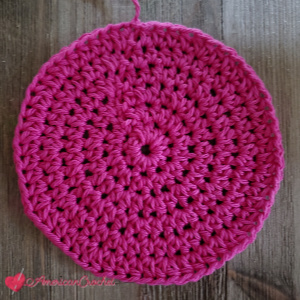
Round 1: Chain 1, work 10 hdc in center of ring. (10 hdc)
Round 2: Chain 1, work 2 hdc in same stitch as join, work 2 hdc in each stitch around; join with a slip stitch in top of 1st hdc. (20 hdc)
Round 3: Chain 1, work 2 hdc in same stitch as join, *hdc in next stitch, work 2 hdc in next stitch,* repeat from 8*to* around; join with a slip stitch in top of 1st hdc. (30 hdc)
Gauge at this point: 9 hdc = 2 inches
Round 4: Chain 1, work 2 hdc in same stitch, *hdc in next 2 stitches, work 2 hdc in the next stitch,* repeat from *to* around; join with a slip stitch in top of 1st hdc. (40 hdc)
Round 5: Chain 1 work 2 hdc in same stitch, *hdc in next 3 stitches, work 2 hdc in next stitch,* repeat from *to* around; join with a slip stitch in top of 1st hdc. (50 hdc)
Round 6: Chain 1, work 2 hdc in same stitch, *hdc in next 4 stitches, work 2 hdc in next stitch,* repeat from *to* around; join with a slip stitch in top of 1st hdc. (60 hdc)
At this point you should measure 6 inches.
Using yarn needle and matching yarn
Lay the bunny face down then the bottom of the bottom on top (right side up). Using your preferred method start at 2 stitches from the head, sew around the bag, stopping at 2 stitches from the head.
Fasten off and weave in ends.
The Handle
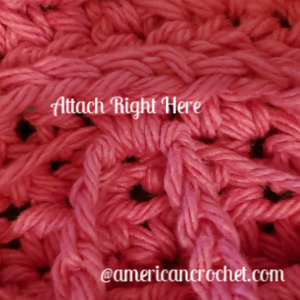
Attach yarn in 1st stitch from head
Round 1: Chain 1 sc in same stitch and in next stitch, *chain 35, sc in the next 2 stitches on opposite side of bag, connecting to the back of the bag, sc in same stitch as join, sc in next stitch,* repeat one more time. Now you should have 2 handle frames. (4 sc, 70 chs)
Round 2: Chain 1, hdc in each chain around, join with a slip stitch to 1st hdc. (70 hdc)
Connecting The 2” Button (or whatever size you chose)
With needle and coordinating color DMC 25 Thread
Sew button to the top of the bottom.

With yarn and H Hook
Chain 15
Fasten Off.
Attach chain to inside of bag (on back of the bunny)
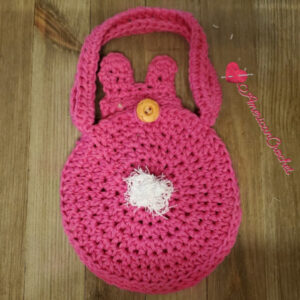
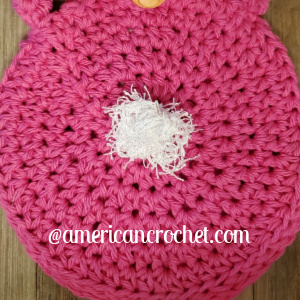
Tail
Using Scrubby yarn
Here I just wrapped enough Scrubby around my 1st two fingers, secured it. Fasten off and attach to the center of the bottom.
Face
Using Sewing Needle and DMC 25 Thread (Coordinating Color)
Sew the 3 little buttons down to make eyes and nose.
I sewed my eyes on the 3rd stitch of Row 2 of the Head (Do this to both sides)
Then I sewed my nose down in middle of Round 6 (between the eyes)
Fasten off and weave in ends.
Did you enjoy crocheting up the Hippity Hoppity Mini Bag? Remember you can always make a few extra to give to your local charity.
Share your progress on Instagram using #HIPPITYHOPPITYMB
Save this pattern to your crochet boards on Pinterest!
Happy Hookin!
XO, Mistie