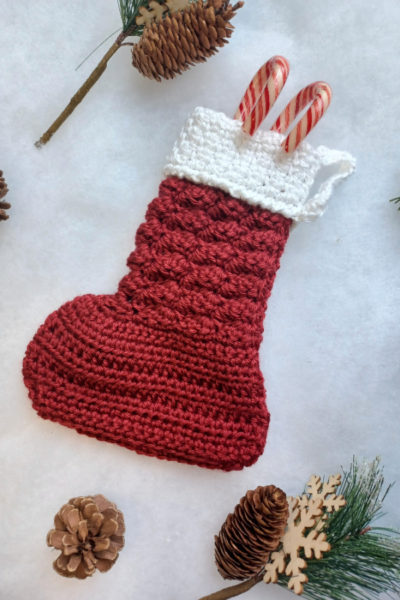
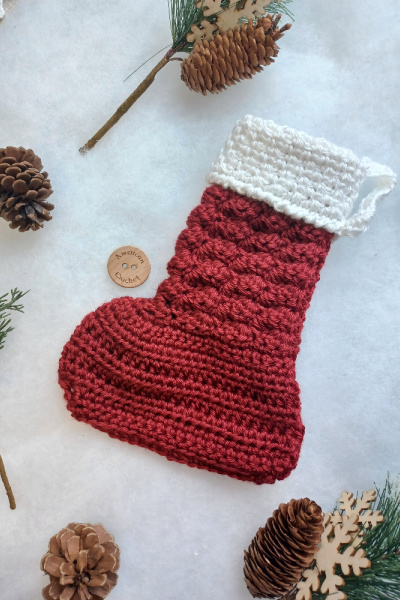
Texture and a little simplicity creates the cutest crochet pieces. This soft, precious Holiday Gleam Gift Stocking is perfect for gift giving.
Queue & Favorite on Ravelry OR Snag it on ETSY!

My gorgeous Holiday Gleam Gift Stocking is part of the Holiday Stashdown CAL 2017. Put a few little stocking stuffers in this cute little stocking. Pass them out to your mail carrier, friends, co-workers, etc. I like giving out small little gifts during the holidays. Enjoy!
It all started when I was a little kid. My mom and I would always make snack mix, bake cookies, make jars of hot chocolate mix, chili mix, seasoning mix, cookies in a jar, and a few other goodies. Then we would give a homemade goody to a friend, teacher, certain people at the banks, our mail carrier, news paper person, clients, and several others. As I got older and started venturing into crafts I then started making little items to go along with the homemade goodies. After I learned to crochet I then started making scarves, hats, etc to go along with the goodies. I can honestly say it warms my heart to give these little gifts and to have kept the tradition going. This year I may even donate a few to charity.
I would love to see your projects in my Facebook Group or on Instagram!
>PIN IT FOR LATER!<<

You can find more of my holiday patterns HERE
This stocking will always be available to follow on my site. Enjoy!
Disclaimer: This post contains affiliate links. When you purchase something through these links I earn a small commission. You do not pay any extra for the item you purchase.
HOLIDAY GLEAM GIFT STOCKING
REQUIREMENTS
Level of Difficulty
- Beginner/Intermediate
Yarn
- 30 yards. #4 worsted weight Caron Simply Soft in Autumn Red and White
Hook and Notions
- Size Hook: H(5mm), scissors, blunt needle and stitch markers (optional)
Measurement
- Band 9” around, 12 ½ “ tall
Gauge
- Foot part 10 10 stitches + 5 rows = 2 inches (over sc)
Abbreviations
- Sc = single crochet
- Ch = chain
- Sl St = slip stitch
- Hdc = half double crochet
- Rsc = reverse single crochet
- St(s) = stitch(s)
- Sp(s) = space(s)
- Sk = skip
- sc2tog
Pattern Notes
- Weigh your yarn cake: ________ grams
- Worked from side to side
- I used #4 worsted weight Caron Simply Soft in Autumn Red and White
- Because I am a tight crocheter I used the I crochet hook to chain with, so the chain isn’t too tight. This will also keep it from buckling. If you crochet loosely then you really shouldn’t have to go up a hook size when chaining. Rule of thumb always check your gauge.
- Chain 1 at beginning of row does not count
Special Stitches
- Granite Stitch (AKA- Linen Stitch, Moss Stitch):
Gauge: 5 rows = 1” of height
Row 1: Ch 1, sc in first st, *ch 1, sk st, sc in next st; repeat from * across. TurnRow 2: Ch 1, *sk sc, sc in ch-1 sp, ch 1; repeat from * across, sc in turning ch of prev row. Turn - FHdc – (Foundation Half double crochet) Chain 2, yarn over, insert hook into first chain (2nd from the hook), yarn over, pull up through the first loop on the hook (this is your first chain loop). With 3 loops on hook, yarn over, pull through 3. * Yarn over, insert your hook into the first chain loop, yarn over, pull up a loop (this is your second chain loop), yarn over, pull through 3. 2 fhdc completed. Repeat from * until you reach the desired number of fhdc.
- Single Crochet Two Together (sc2tog) – insert hook into indicated stitch and draw up a loop, insert hook into next stitch and draw up a loop, yarn over and draw through all 3 loops on the hook.
Video Tutorials if available will be on my YouTube Channel – Subscribe to my YouTube Channel!
Queue & Favorite on Ravelry OR Snag it on ETSY!
HOLIDAY GLEAM GIFT STOCKING INSTRUCTIONS
Leg
Working with I hook
Ch 34
Working with H hook
Row 1 (RS): hdc in 2nd chain from hook and in each chain across. 33 hdc
Fasten off.
OR
FHDC 33 (see Special Stitches)
Fasten off.
With right side facing, attach yarn into hdc at the opposite end of row.
Now you will start the fan section. Be sure to keep your tension relaxed across this section otherwise your stitches will start to pull in the sides. Feel free to go up a hook size if needed however, keep in mind that you do not want there to be gaps throughout your work.
Row 2 (RS): Ch 1, (sc, hdc, 2 dc) in same st, *sk 3 sts, (sc, hdc, 2 dc) in next st,* repeat from * across, sc in the last st. Turn (1 sc, 8 fans)
My gauge was roughly 2 rows in 1” of height.
Repeat Row 2:
13 times or until that section measures 5 ½”
Shape Foot
Row 3: Ch 1, sc in the 1st 12 sts, work (2 sc in the next 8 sts), sc in the last 13 sts. Turn (41 sc)
Row 4: Ch 1, sc in the 1st 12 sts, *work 2 sc in the next sc, sc in the next stitch,* 7 more times, sc in the last 13 sts. Turn (49 sc)
Row 5: Ch 1, work 2 sc in 1st sc, sc in the next 47 sc, work 2 sc in the last sc. Turn (51 sc)
Row 6: Ch 1, hdc in each sc across. Turn (51 hdc)
Repeat Row 6:
4 times or until that section measures 2”
At this point your stocking should measure roughly 9 ½”
Shaping Toe
Row 7: Ch 1, sc in the 1st 20 sts, sc2tog (5 times), sc in last 21 sts. Turn (46 sc)
Row 8: Ch 1, sc2tog, sc in the next 18 sts, sc2tog, sc, sc2tog, sc in the next 19 sts, sc2tog over the last 2 sts. Turn (42 sc)
Row 9: Ch 1, sc2tog, sc across to the last 2 sts, sc2tog. (40 sc)
Fasten Off and leave long enough tail for sewing
Now your stocking should measure roughly 10 ½”
Cuff
(WS) Attach White at top of stocking
Now you will start the granite stitch section. Be sure to keep your tension relaxed across this section otherwise your stitches will start to pull in the sides. Feel free to go up a hook size if needed.
Row 1: Ch 1, sc in first st, *ch 1, sk st, sc in next st; repeat from * across. Turn 23, (31, 39, 47 sts)
Row 2: Ch 1, *sk sc, sc in ch-1 sp, ch 1; repeat from * across, sc in turning ch of prev row. Turn 24, (32, 40, 48 sts)
Repeat Row 2
8 times or until that section measures 1 ½”
At this point your stocking should measure roughly 12 ½” from Row 1 to where you stopped.
Row 3: Ch 1, sc in each st across do *not* work into turning ch at end of row.
Cuff Trim
Now you will work the crab stitch across the top. You may wish to go down a hook size when working the crab stitch to make it look neater.
Fasten off do not weave in ends.
Fold stocking inside out. With matching color start at the toe use your favorite stitch to sew together. Turn the stocking right side out. Using the cuff color sew the cuff together. Fasten off and weave in ends.
Hanger
Using the cuff color attach at the top of your cuff seam
Ch 25 (I chained 15 for a smaller hanger), sl st at the seam above the cuff trim, ch 1, hdc in each ch.
Fasten off do not weave in ends.
Don’t forget to share your projects in my Facebook Group and/or on Instagram!
>>> SIGN UP FOR THE AMERICAN CROCHET NEWSLETTER! <<<
Happy Hookin!
XO, Mistie
